Tuesday, January 31, 2012

Lamp Re-Vamp, Part 2

After completing a simple but effective lamp re-vamp last week, I decided to take on a little more challenging lamp re-vamp.  I found this tutorial on Shannon Berrey's blog and thought it would be a perfect way to breathe new life into Finley's bedroom lamp.


I love how Shannon's lamp had a monogram on it, but unfortunately when Finley's initials are placed in monogram order (first, last, middle) her's spells FOG.  So I went with a single initial instead.  (Note to self: take monograms into consideration when naming any subsequent children.)


I found a cute font and drew it out freehand since my printer was being persnickety.  I hate it when that happens.


 Next up, I cut it out, placed it on my felt and carefully cut it out.


 The cut-out F for Miss Finley!


 By the way, I used this felt that had a sticky backing on it so that I didn't need to use spray adhesive.  It also gave the felt some added body, making it easier to cut; however, it's a little more expensive - $1.99 per sheet versus $0.34 a sheet.


For the bottom trim, I bought 1 3/8-inch ruffled trim in Shocking Pink.  I bought a yard of it for $3.99 at Joann's.


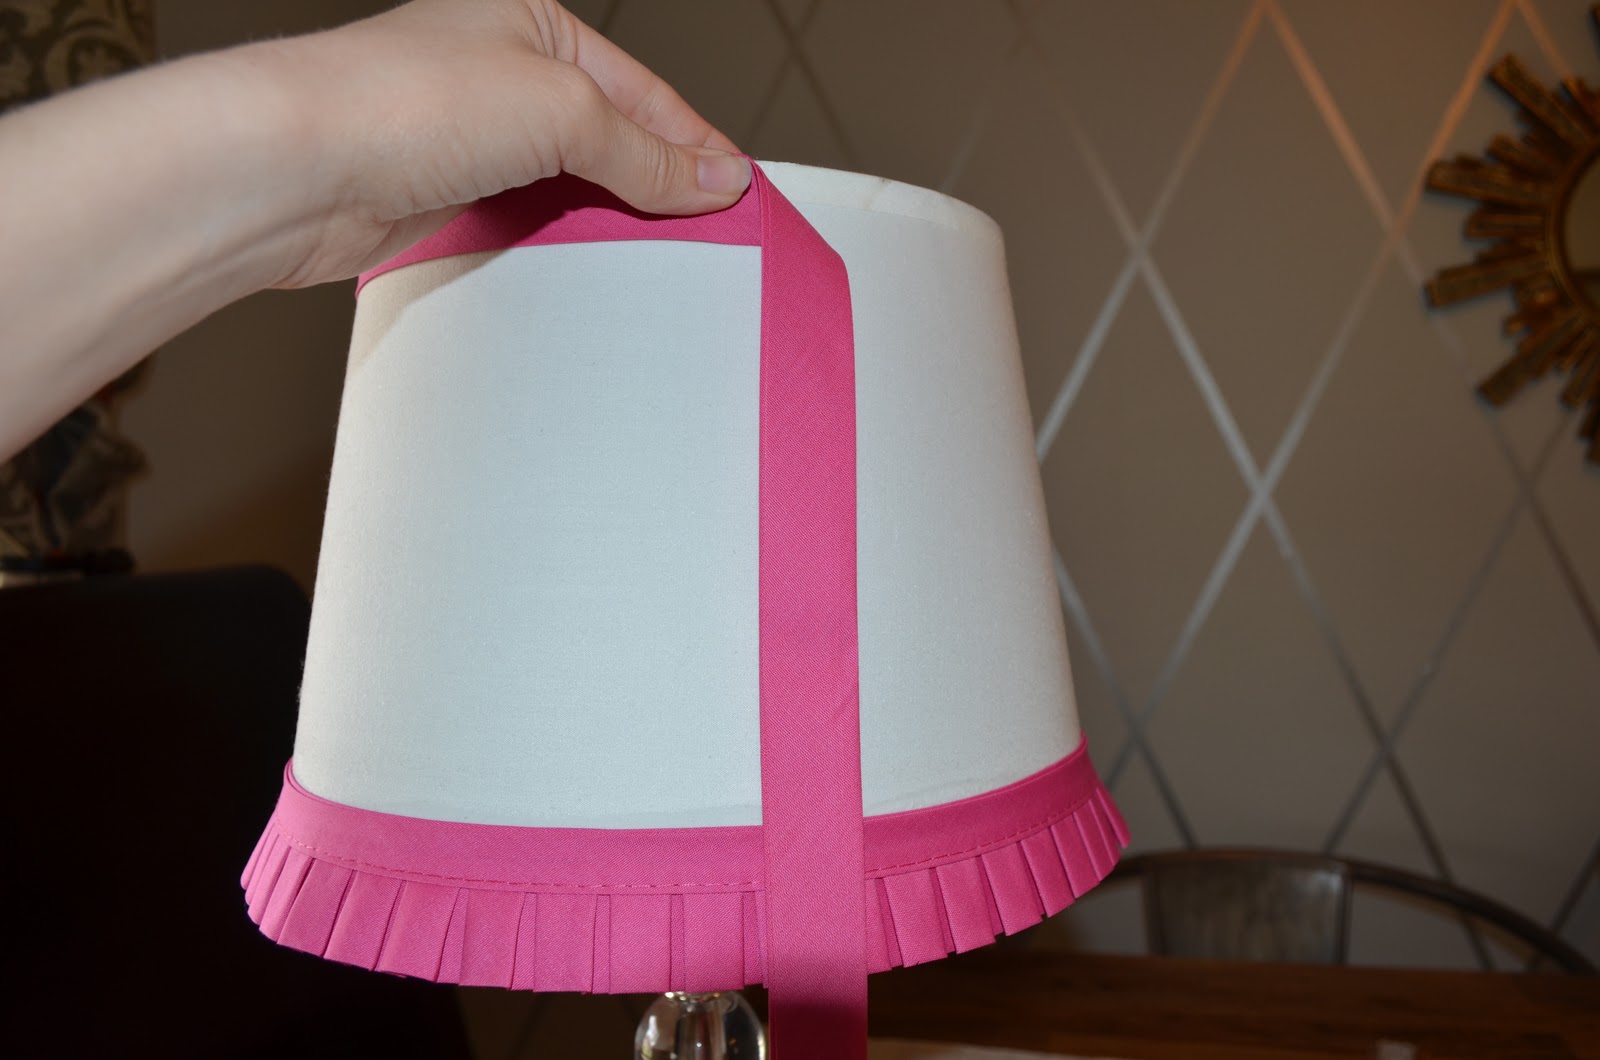
For the top trim, I used a matching wide bias tape that was $2.90.


I used a clip to help hold the seams together while they dried...


And then I added on the F and I have a completed lamp re-vamp for a whopping total of $8.88 plus tax! I think Finley is going to love it in her new room too!

Friday, January 27, 2012

Lamp Re-Vamp

While I was taking pictures of our master bedroom for a previous post, I noticed how our bedside lamps blended in with the walls.  I remembered having some extra blue bias tape from a project that I finished last fall and decided to 'dress up' the lamp shades a bit.    


I gathered my supplies and got to work.  I used wide bias tape in Stone Blue, scissors, paint brush and Mod Podge.  In the past, I've used fabric glue to bind ribbon and trim to things and the glue shows through the material.  So since I already owned the Mod Podge I used that.  I'll let you know if the trim starts falling off!  


Starting at the seam, 'paint' the glue on to the lampshade and adhere the bias tape, slowly wrapping back around to your starting point.  Really it couldn't be any simpler!


Now our cute little lampshade has some personality and pizzaz and no one can accuse it of blending into the background anymore!


Best part - since I already owned everything, it was a free make-over!

Thursday, January 26, 2012

Before & After -The Master Bedroom

When we moved into our house, the master bedroom (which is sort of a joke in today's standards) was a small, blank slate.  Everything was whitish - tile floors, walls, moldings and closet doors.  Even the ceiling fan was white.


As newlyweds, Andrew and I didn't have much money to spend decorating the master bedroom, so we worked with what we had.  When we put our house on the market (almost two years ago), this is what the room looked like:
Not bad, but nothing to brag about either.  When our house didn't sell, I decided that we deserved to spend a little money turning our master bedroom into a place that was inviting and a retreat from the toys and children's books that have invaded all other areas of our home.  


 Since the room is pretty much dwarfed by our king size bed, it made sense to make the bed the focal point of the room.  We didn't have a headboard, nor did I want to buy one...so I recruited Andrew and his saw to help me make my own fabric headboard.  And I love how it turned out!  With about $75 in supplies (including fabric), we have a "custom made" fabric headboard.  Similar ones from Pottery Barn can run upwards of $800 - $900, so I think our $75 one is pretty great.


 {A close-up of the fabric on the headboard and the oversized throw pillows}


On our old bed, we had 13 throw pillows.  I know, thirteen - crazy!  So to simplify things, I chose over-sized throw pillows so now we're down to just four throw pillows (plus our sleeping pillows).


This is our original bedside table, but I painted it a light olive green and added corbels on the inside corners.  I found my inspiration for the project on Little Green Notebook, which is a fabulous design blog.  For about $15, I was able to bring new life into our dated tables.  Much cheaper than buying new ones!  

The white lamp shades blended in with our very light tan walls, so I worked a little lamp re-vamp and used a little bias tape and glue to make the lampshades stand out a bit more.  The lamp re-vamp was also an idea from Little Green Notebook! 

For added storage, I bought two small canvas bins to hold our miscellaneous bedside items (i.e. books, magazines, phone chargers, etc.).


I love this print by Jones Design Company that I bought to hang above my bedside table.  I love that it is one of the first things I see upon waking and one of the last things I see before sleeping.  It serves as a wonderful reminder as to what is truly important in life.  


To give the space added drama, we replaced the horrible mini-blinds with a natural roman shade and flanked it with these striped curtains.  To make our low ceilings seem grander, I hung the curtain rod closer to the ceiling and to make our one window seem larger, I hung the curtain rod 12 inches wider than the actual window.  This way the curtain don't actually block any of the window so that all the natural light can still come into the room.  Since I already had a pair of plain white Ikea curtains that weren't being used, I decided to make my own curtains.  I've always loved Courtney of (A Thoughtful Placedining room curtains, so I used her curtains as my inspiration.  And then I found this fabulous tutorial from Dear Lillie on Pinterest, which allowed me to make my own! Since I already owned the curtains and curtain rod, the striped curtains only cost me about $9 to make ($6 for painter's tape and $3 for a jar of sample paint).

Sourcing
Large Throw Pillows - Steinmart
Oblong White Throw Pillow - Target
Supplies for the headboard - Lowe's 
Fabric for the headboard & dust ruffle - Interior Fabrics
Small mirror above bed - Hobby Lobby with 50% off coupon
Bedside table corbels & paint - $15 Lowe's
Art prints above bedside tables - Jones Design Company
Curtains - Ikea
Curtain Supplies - Lowe's
Lamps & Lampshades - Lowe's
Lampshade trim - Joann's
Ceiling Fan - Lowe's

Wednesday, January 25, 2012

Before & After - The Office Area

Why "office area" rather than just "office"?  Well, like most smaller, older homes, our's has a few quirky areas, one of which is adjacent to the kitchen.  Originally we had a huge, ugly, scarred deep freezer placed there, but eventually I convinced my husband to part with it.  Then we bought these industrial shelves to serve as extra storage, which were functional but not very pretty.

When we put our house on the market, the home stager said we should make the area into a breakfast room.  I scouted out a cheap table and chairs set and put them in.  It definitely looked better (still not great though), but it wasn't at all functional for us.  We literally never used the space.  As soon as we took our house off the market, I listed the table set on Craigslist.  (Also, please notice the random single lower cabinet that is to the right of the door.  As if that weren't bad enough, whoever last remodeled the kitchen, also slapped up a huge laminate backsplash.  Say whatty-what?!?)

And then we were left with this random unused space...which we turned into a tiny office area.


First off, we removed the unused lower cabinet and backsplash to open the area up.  Since there isn't a window along the back wall, that area doesn't seem light and bright.  To combat that, I hung three door mirrors horizontally.  The mirrors reflect the light from the kitchen to brighten the space and add some interest along the wall.  The best part - I bought the mirrors at Target when they were having their back to school sale so the mirrors were only $4 each.  $12 for a focal wall - check, check, and check!  Now the space is functional and pretty.

Tuesday, January 24, 2012

Before & After - The Family Room


The original dining room featured a wall of cabinets, built-in bookshelf, exposed cedar beam and fake-slate linoleum tile.  Hardly charming, and not terribly functional or attractive.  
We tried our best to make the dining room presentable, but it was a space that never seemed to work well for us.  We always found it odd that such a small house would have such a large dining room...
and that's why we turned it into our family room!


 We ripped out the lower and upper cabinets to create a space for our TV and Finley's books and toys.


We opted to keep the built-in bookshelf because it was actually useful.  To add a little pizzaz to it, I stenciled this design (free courtesy of Jones Design Company) along the back of the bookshelf to mimic wallpaper.  All in all, the stencil project probably took around 3 hours, which was time well spent in my book.


 We painted the beam to help it blend in a bit better and we ripped out four (4!!) layers of linoleum and put down wood floors.  Looking at the floors still makes me a happy girl!  In addition to ripping out the cabinets on what is now the TV wall, we also ripped out a very randomly placed lower cabinet that was to the right of the sliding glass door.  My orange reading chair is now in its place.  


Here is the view of the room from the kitchen.

Monday, January 23, 2012

Before & After - The Bathroom

Who doesn't love some good before and after pictures?  I thought we'd start the house tour off with the smallest room in our house - the good, old bathroom!

 Here are the two wallpapers in the bathroom...whoever put them together has to be color blind!

 Gray tile on the floors, walls and in the tub...and what bathroom wouldn't be complete without a brown shaggy toilet seat cover?!?  I wish I had a better picture of the entire bathroom because it was a sight!  It had a large, three-mirror medicine cabinet that took up the entire wall above the sink and it also features a row of huge globe lights, a la Hollywood make-up mirror light.  Yikes bikes!

The bathroom now!  Out of any room in the house, the bathroom got the biggest overhaul.  It was taken down to the studs and re-built with all new things - the only thing we kept was the pedestal sink.  

 We opted to get rid of the glass door in favor of a shower curtain.  When you only have one bathroom, it's nice to be able to hide all of your family's many shower and bath products.  I tried to keep the room fairly neutral with an array of whites and tans, drawing inspiration from this Crate & Barrel shower curtain.  

 Probably my husband's favorite part of the room - the larger shower head that was raised so that his 
6' 4" self can easily fit under it.  


To keep things simpler, we used the same tile on the floor and for the bath surround.

Friday, January 20, 2012

Kid Friendly Throw Pillows

With a toddler (who loves to drink her juice and eat her snacks on the couch) and a large black dog (who loves to sleep on aforementioned couch), I need throw pillows that will stand up to spills and dog hair on top of the normal everyday wear and tear.  Outdoor fabrics are a great kid-friendly alternative to expensive throw pillows because they don't absorb spills into the fabric making them easier to clean.  I've found some really cute ones for great prices lately.

If I hadn't promised Andrew I wouldn't buy anything, this puppy would have come home with me yesterday!  I may just have to go back and get it though!


Love the orange contrasting trim!


And for my very favorite outdoor pillows to use indoors...

which looks a whole heck of a lot like Kelly Wearstler's Imperial Trellis fabric that runs around $160/yard.  I think that officially qualifies as a steal of a deal!


The Background Deets


{our wedding party}

I feel like I should share more about myself, my family, our house and why I decided to start a home blog.  (And more than a few random pictures thrown in just for fun.)  First off, my name is Erin and I'm in my early-to-mid-thirties.  (Geez!  Mid-thirties?  When did that happen?  I swear I was just in college...)  I'm a stay-at-home mom to a wonderful 2 1/2 year old daughter, Finley, and I'm married to an incredible guy named Andrew.  We've been married a little over 4 years and we live in central Austin with our big (read: quite chunky or just plain fat), black Lab named Rusty.  Why a black Lab is named Rusty, you ask? You'll have to take that up with my hubby!


{our house when we first bought it}

Andrew bought our little 1950's ranch bungalow almost 6 years ago, when the market was high and houses were selling like hot-cakes in our neighborhood.  Seriously, homes were only on the market a few days before you'd get an offer.  Those were the days!  Big sigh.  After we had Finley, I felt like we were quickly outgrowing our 2 bedroom/1 bathroom, 1150 square foot house.  We decided to put our house on the market in the spring of 2010.  Naively, we expected our house to sell quickly.  When September rolled around without having received a single offer, we took our house off the market.


{November 2010 - Finley, 15 months}

I grew up in the suburbs and just assumed my kids would too.  While our house was on the market, we put a contingency offer on a house in the 'burbs and I had already mentally moved in and decorated the place.  But God definitely had other plans for us.


{super cute, smily Finley}

When Andrew and I got married, we combined our random pieces of furniture, many were cast-offs given to us by generous relatives.  And in Andrew's case, some of his stuff was particle board crap that he'd had since college.  (I'm still in awe that he moved that stuff around with him for 10 years...)  Anyway, long story short, we really hadn't spent much money at all on decorating our house because we assumed we'd save those expenditures for our 'new house.'  "Why buy new sofas for this house when we don't know what kind of furniture our new house will need?" was our way of thinking.

{Mama and Finley, 27 months}

I tend to be a pretty positive, glass half full type of person, and when something bad or unforeseen happens, I try to search for reasons why to make sense of the big picture.  I have a background in psychology and it's in my nature to analyze and over-analyze things until I come up with an acceptable explanation.  I was pretty crushed when our house didn't sell and it didn't take me long before I realized that I grew up in one house from the age of four.  So when we had Finley, I was subconsciously trying to find our forever home, so that she too could grow up in one place; however, Andrew's family lived in three or four homes while he was growing up.  To him, there was no need for a forever home, but he understood where I was coming from.  Sweet man that he is he understood that even though our little bungalow wasn't going to be our forever home, I needed to make our house into a home.


{Finley seen as she most often is - in motion!, 28 months}

Once it was decided that we were going to scrape some money together for remodeling and decorating, I got to work.  Slowly over the course of the next year, I (with the help of our wonderful contractor) went to work.  While much of the bigger projects are finished, I still have quite a few that need to be completed.

{two of my very favorite people}

Remember that house I mentioned earlier that we put an offer on?  Well, it burned down in one of the many wildfires we had in Central Texas last summer.  I remember the shock of watching the news and seeing Steiner Ranch (the neighborhood the house was in) was on fire.  In that instant, I knew why God's plan for us was to stay put.  While I can't help but question God's plans for us at times, I am so thankful for His love and protection.