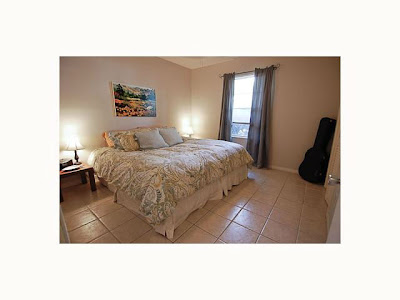
When we moved into our house, the master bedroom (which is sort of a joke in today's standards) was a small, blank slate. Everything was whitish - tile floors, walls, moldings and closet doors. Even the ceiling fan was white.
As newlyweds, Andrew and I didn't have much money to spend decorating the master bedroom, so we worked with what we had. When we put our house on the market (almost two years ago), this is what the room looked like:
Not bad, but nothing to brag about either. When our house didn't sell, I decided that we deserved to spend a little money turning our master bedroom into a place that was inviting and a retreat from the toys and children's books that have invaded all other areas of our home.
Since the room is pretty much dwarfed by our king size bed, it made sense to make the bed the focal point of the room. We didn't have a headboard, nor did I want to buy one...so I recruited Andrew and his saw to help me make my own fabric headboard. And I love how it turned out! With about $75 in supplies (including fabric), we have a "custom made" fabric headboard. Similar ones from Pottery Barn can run upwards of $800 - $900, so I think our $75 one is pretty great.
{A close-up of the fabric on the headboard and the oversized throw pillows}
On our old bed, we had 13 throw pillows. I know, thirteen - crazy! So to simplify things, I chose over-sized throw pillows so now we're down to just four throw pillows (plus our sleeping pillows).
This is our original bedside table, but I painted it a light olive green and added corbels on the inside corners. I found my inspiration for the project on Little Green Notebook, which is a fabulous design blog. For about $15, I was able to bring new life into our dated tables. Much cheaper than buying new ones!
The white lamp shades blended in with our very light tan walls, so I worked a little lamp re-vamp and used a little bias tape and glue to make the lampshades stand out a bit more. The lamp re-vamp was also an idea from Little Green Notebook!
For added storage, I bought two small canvas bins to hold our miscellaneous bedside items (i.e. books, magazines, phone chargers, etc.).
I love this print by Jones Design Company that I bought to hang above my bedside table. I love that it is one of the first things I see upon waking and one of the last things I see before sleeping. It serves as a wonderful reminder as to what is truly important in life.
To give the space added drama, we replaced the horrible mini-blinds with a natural roman shade and flanked it with these striped curtains. To make our low ceilings seem grander, I hung the curtain rod closer to the ceiling and to make our one window seem larger, I hung the curtain rod 12 inches wider than the actual window. This way the curtain don't actually block any of the window so that all the natural light can still come into the room. Since I already had a pair of plain white Ikea curtains that weren't being used, I decided to make my own curtains. I've always loved Courtney of (A Thoughtful Place) dining room curtains, so I used her curtains as my inspiration. And then I found this fabulous tutorial from Dear Lillie on Pinterest, which allowed me to make my own! Since I already owned the curtains and curtain rod, the striped curtains only cost me about $9 to make ($6 for painter's tape and $3 for a jar of sample paint).
Sourcing
New bedding in Taupe - Overstock
Large Throw Pillows - Steinmart
Oblong White Throw Pillow - Target
Supplies for the headboard - Lowe's
Fabric for the headboard & dust ruffle - Interior Fabrics
Small mirror above bed - Hobby Lobby with 50% off coupon
Bedside table corbels & paint - $15 Lowe's
Art prints above bedside tables - Jones Design Company
Curtains - Ikea
Curtain Supplies - Lowe's
Lamps & Lampshades - Lowe's
Lampshade trim - Joann's
Ceiling Fan - Lowe's


No comments:
Post a Comment